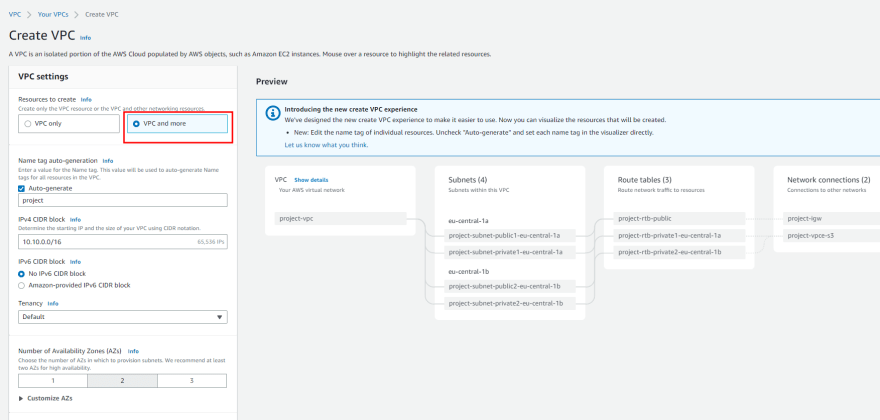
However, after the creation of the VPC, the diagram that was available during the creation experience that many of our customers loved was no longer available. Today we are changing that! With VPC resource map, you can quickly understand the architectural layout of the VPC, including the number of subnets, which subnets are associated with the public route table, and which route tables have routes to the NAT Gateway.
You can also get to the specific resource details by clicking on the resource. This eliminates the need for you to map out resource relationships mentally and hold the information in your head while working with your VPC, making the process much more efficient and less prone to mistakes.
Getting Started with VPC Resource Map
To get started, choose an existing VPC in the VPC console. In the details section, select the Resource map tab. Here, you can see the resources in your VPC and the relationships between those resources.

As you hover over a resource, you can see the related resources and the connected lines highlighted. If you click to select the resource, you can see a few lines of details and a link to see the details of the selected resource.
Getting Started with VPC Creation Experience
I want to explain how to use the VPC creation experience to improve your workflow to create a new VPC to make a high-availability three-tier VPC easily.
Choose Create VPC and select VPC and more in the VPC console. You can preview the VPC resources that you are about to create all on the same page.

In Name tag auto-generation, you can specify a prefix value for Name tags. This value is used to generate Name tags for all VPC resources in the preview. If I change the default value, which is project to channy, the Name tag in the preview changes to channy- something, such as channy-vpc. You can customize a Name tag per resource in the preview by clicking each resource and making changes.
You can easily change the default CIDR value (10.0.0.0/16) when you click the IPv4 CIDR block field to reveal the CIDR joystick. Use the left or right arrow to move to the previous (9.255.0.0/16) or next (10.0.1.0/16) CIDR block within the /16 network mask. You can also change the subnet mask to /17 by using the down arrow, or go back to /16 using the up arrow.
more details – Visualize the resources in your VPC