The geo-redundant High Availability scenarios that can be enabled using Azure Standard Load Balancing include:
- There is incoming traffic from multiple regions.
- Instant global failover to the next optimal regional deployment.
- Load distribution across regions to the closest Azure region with ultra-low latency.
- Ability to scale up/down behind a single endpoint.
- An IP address that is static for anycast globally
- Client IP preservation
- Build on existing load balancer solution with no learning curve
Your cross-region load balancer’s frontend IP setup is static and advertised in the majority of Azure regions.
A list of participating regions
- Australia East
- Australia Southeast
- Central India
- Central US
- East Asia
- East US
- East US 2
- Japan East
- North Central US
- North Europe
- South Central US
- Southeast Asia
- UK South
- US DoD Central
- US DoD East
- US Gov Arizona
- US Gov Texas
- US Gov Virginia
- West Central US
- West Europe
- West US
- West US 2
There are limitations:
- Only the public can view cross-region frontend IP setups. Presently, an internal frontend is not supported.
- A cross-region load balancer’s backend pool cannot be expanded using private or internal load balancers.
- NAT64 translation is not currently supported. There must be compatibility between the frontend and backend IP types (v4 or v6).
- For IPv6, Cross-region Load Balancer does not handle UDP traffic.
- Cross-region Load Balancer does not support outbound rules. Use the outbound rules on the local load balancer or NAT gateway for outgoing connections.
A cross-region (global) load balancer can only be deployed to a home region. Make sure you have selected a valid region
Using the Azure portal, create a cross-region Azure Load Balancer
- To create a load balancer, select the Create option.
| Setting | Value |
|---|---|
| Project details | |
| Subscription | Select your subscription. |
| Resource group | Select Create new and enter CreateCRLBTutorial-rg in the text box. |
| Instance details | |
| Name | Enter myLoadBalancer-CR |
| Region | Select (US) West US. |
| Type | Select Public. |
| SKU | Leave the default of Standard. |
| Tier | Select Global |
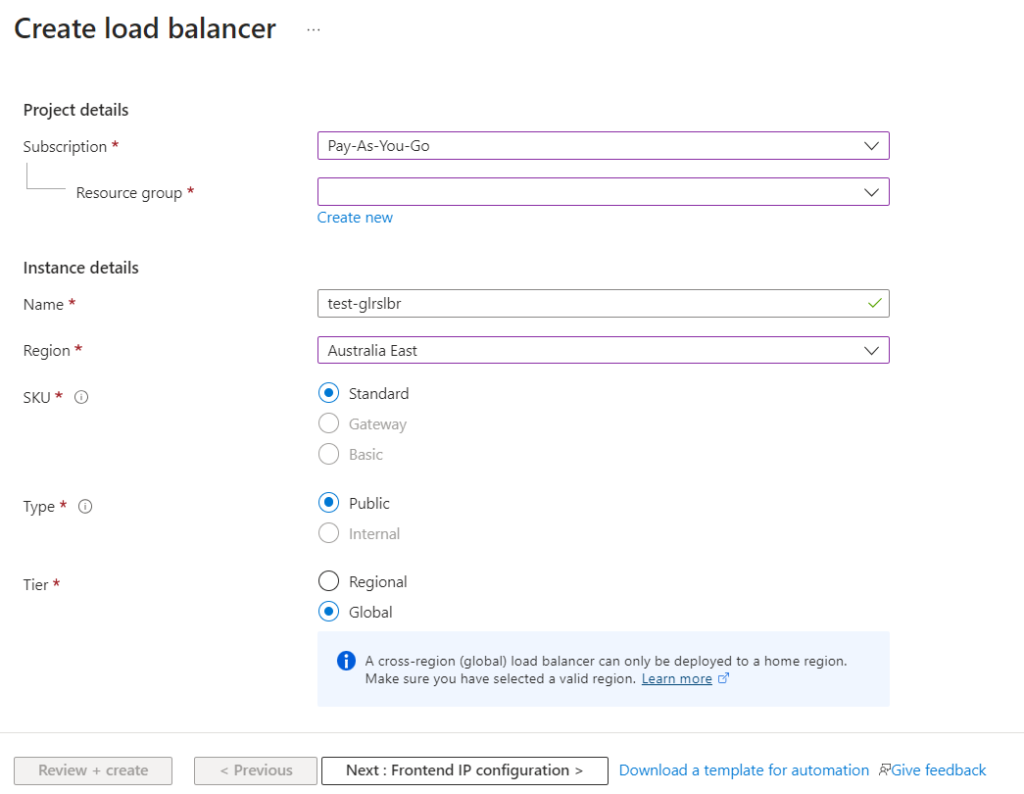
2. At the bottom of the page, select Next: Frontend IP configuration.
3. Select + Add a frontend IP from the Frontend IP setup menu.
4. Enter LoadBalancerFrontend in Name in Add frontend IP address.
5. Select IPv4 or IPv6 for IP version.
6. In Public IP address, select Create new. Enter tstpbip in Name. Select OK.
7. Select Add
8. Select Next: Backend pools at the bottom of the page.
9. In Backend pools, select + Add a backend pool.
10. Enter tstbckend in Name in Add backend pool.
11. In Load balancers, select tstlb or your first regional load balancer in the Load balancer pull-down box. Verify the Frontend IP configuration and IP address correspond with tstlb.
12. Select tstlb02 or your second regional load balancer in the Load balancer pull-down box. Verify the Frontend IP configuration and IP address correspond with tstlb02.
13. Select Add.
14. Select Next: Inbound rules at the bottom of the page.
15. In Inbound rules, select + Add a load balancing rule.
16. In Add load balancing rule, enter or select the following information:
| Setting | Value |
|---|---|
| Name | Enter tsthttprule |
| IP Version | Select IPv4 or IPv6 for IP Version. |
| Frontend IP address | Select LoadBalancerFrontend. |
| Protocol | Select TCP. |
| Port | Enter 80. |
| Backend pool | Select tstbckend. |
| Session persistence | Select None. |
| Idle timeout (minutes) | Enter or move the slider to 15. |
| TCP reset | Select Enabled. |
| Floating IP | Leave the default of Disabled. |
17. Select Add.
18. Select Review + create at the bottom of the page.
19. Select Create in the Review + create tab.
refer- loadbalancer documentation