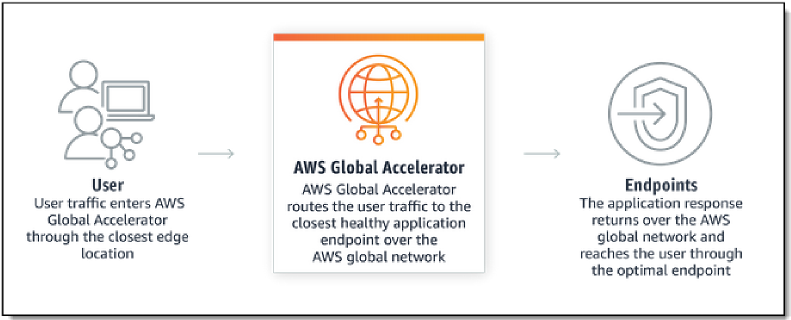
AWS Global Accelerator is a network service that routes incoming network traffic over the AWS global network to multiple AWS Regions in order to improve performance and availability for your global applications. It makes use of our collection of edge locations and our congestion-free global network to direct traffic based on application health, network health, and the geographic locations of your users. It provides a set of static Anycast IP addresses that are announced from multiple AWS locations (read New – AWS Global Accelerator for Availability and Performance to learn a lot more). The incoming TCP or UDP traffic can be routed to an Application Load Balancer (public or private), Network Load Balancer, private EC2 Instances, or to an Elastic IP Address.
Background of BYOIP:
Many of our customers have applications that use static public IP addresses. These are trusted IP addresses that are used by their partners and customers in firewall whitelists. AWS has previously released Bring Your Own IP (BYOIP) feature for EC2 Elastic IPs to address challenges related to IP address changes during cloud migration. We are now extending this feature to AWS Global Accelerator. With this feature, you can now configure your accelerator to use Public IPv4 addresses from your own address range instead of using the Global Accelerator-provided static IP addresses.
This feature allows you to migrate your applications to AWS without requiring your partners and customers to change their IP address whitelists. This is useful for telecommunications and Voice over Internet Protocol (VoIP) applications where customers whitelist an IP address range for their VoIP provider. Some legacy applications or IoT devices have hardcoded IP address dependencies. Bring Your Own IP enables you to migrate such applications to AWS and use Global Accelerator to improve your application availability and route traffic to the endpoint that provides the best application performance
This blog post walks you through how to bring your Public IPv4 addresses to use with Global Accelerator.
Preparing your IP address ranges:
The process for preparing your IP Addresses is similar to BYOIP on EC2, with some small differences. Key requirements to Bring Your Own IP Address (BYOIP) for Global Accelerator are:
- Currently only IPv4 is supported.
- Length of the IP address ranges must be a /24.
- IP addresses must be registered to a business/institution via your regional internet registry (RIR), such as the American Registry for Internet Numbers (ARIN), Réseaux IP Européens Network Coordination Centre (RIPE), or Asia-Pacific Network Information Centre (APNIC).
- IP Address allocation from regional internet registries (RIR) must be one of following:
- APNIC: “ALLOCATED PORTABLE” and “ASSIGNED PORTABLE” allocation statuses
- ARIN: “Direct Allocation” and “Direct Assignment” network types
- RIPE: “ALLOCATED PA”, “LEGACY”, and “ASSIGNED IP” allocation statuses
Step 1: Create a ROA object
You must provide proof of the ownership of IP ranges and authorization to bring and advertise IP addresses via AWS. To authorize AWS to advertise IP addresses, Route Origin Authorization (ROA) must be used. A ROA is a cryptographically signed object with the following key information in it:
Note: In this blog, we use 169.254.214.0/24 as an example.
- The AS Number that is authorized (i.e. Amazon ASN 16509)
- The prefix that must be originated from the AS supplied above (e.g. 169.254.214.0/24)
- The Maximum length of the prefix (i.e. /24)
You can read more details and submit the request for ROAs here:
- APNIC: https:/ blog.apnic.net/2019/09/11/how-to-creating-rpki-roas-in-myapnic
- ARIN: https:/ www.arin.net/resources/manage/rpki/roa_request/
- RIPE: https:/ www.ripe.net/manage-ips-and-asns/resource-management/certification/resource-certification-roa- management
Step 2: Create a self-signed X509 certificate
Since ROAs do not specify your AWS Account #, we must authorize the request via RDAP (Registration Data Access Protocol) records in your RIR. The following steps describe how to perform these tasks:
- Generate an RSA 2048-bit key pair. Example command:
openssl genrsa -out private.key 2048 - Create a public X509 certificate from the key pair. Example command that generates a certificate with 365 days expiry:
openssl req -new -x509 -key private.key -days 365 | tr -d "\n" > publickey.cer
Please note the days specified in above example is the duration that this certificate can be trusted. This certificate is only needed during provisioning process and can be deleted after successful provisioning
- Update RDAP records in for your RIR using the X509 certificate generated in above step. You must include —–BEGIN CERTIFICATE—– and —–END CERTIFICATE—– from the certificate.
- For ARIN: add the certificate in the Public Comments section for your IP Address range.
- For RIPE: add the certificate as a new descr field for your IP Address range.
- For APNIC: send the public key via email to helpdesk@apnic.net, the APNIC authorized contact for the IP Addresses, to request that they manually add it to the remarks field.
Step 3: Create a signed authorization message
Once above steps are completed, now you are ready to create Signed Authorization Message to allow Amazon to advertise IP CIDRs. The format of the message is as follows:
1|aws|aws-account|address-range|YYYYMMDD|SHA256|RSAPSSYYYYMMDD is the expiration date of the message. The only values that you must supply are AWS account, address-range, and YYYYMMDD.
In our example, the message content would be following:
1|aws|123456789012|169.254.214.0/24|20200224|SHA256|RSAPSSYou can store the message in a variable, which can be reused later. Example command for following
text_message="1|aws|123456789012|169.254.214.0/24|20200224|SHA256|RSAPSS"You use this variable to sign the message using the key pair that was generated in Step-2 and store again in a variable that you can use later in AWS CLI commands to provision address ranges.
signed_message=$(echo $text_message | tr -d "\n" | openssl dgst -sha256 -sigopt \
   rsa_padding_mode:pss -sigopt rsa_pss_saltlen:-1 -sign private.key -keyform PEM | \
   openssl base64 | tr -- '+=/' '-_~' | tr -d "\n")
Provisioning:
The provisioning process is completed via AWS CLI/AWS SDK. In this blog, we use AWS CLI to complete the provisioning process.
Note: You must specify the US West (Oregon) Region to use Global Accelerators APIs.
To provision the IP ranges for Global Accelerator – you can use the ProvisionByCidr API call.
aws globalaccelerator provision-byoip-cidr --cidr 169.254.214.0/24 \
   --cidr-authorization-context Message="$text_message",Signature="$signed_message" \
   --region us-west-2
{
    "ByoipCidr": {
        "Cidr": "169.254.214.0/24",
        "State": "PENDING_PROVISIONING"
    }
}
Also note that BYOIP Provisioning is an asynchronous process. A successful call is returned immediately with the state PENDING_PROVISIONING. It can take up three weeks to complete the provisioning process, which includes verification that you own the address range.
To check the status of address range provisioning, you can use ListByoipCidrs API call.
aws globalaccelerator list-byoip-cidrs --region us-west-2
{
    "ByoipCidrs": [
        {
            "Cidr": "169.254.214.0/24",
            "State": "PENDING_PROVISIONING"
        }
    ]
}
aws globalaccelerator list-byoip-cidrs --region us-west-2
{
"ByoipCidrs": [
{
"Cidr": "169.254.214.0/24",
"State": "READY"
}
]
}Once in “READY” state, you can now start the advertisement process using AdvertiseByoipCidr API Call. We recommend that you stop advertising the CIDRs from other locations before starting advertisement process. If it is still being advertised from other locations, Amazon cannot guarantee that traffic to the addresses will enter our network.
aws globalaccelerator advertise-byoip-cidr --cidr 169.254.214.0/24 --region us-west-2
{
    "ByoipCidr": {
        "Cidr": "169.254.214.0/24",
        "State": "PENDING_ADVERTISING"
    }
}
AdvertiseByoipCidr is also an asynchronous operation and you can check the status of the BYOIP CIDR using ListByoipCidrs API call.
aws globalaccelerator list-byoip-cidrs --region us-west-2
{
    "ByoipCidrs": [
        {
            "Cidr": "169.254.124.0/24",
            "State": "ADVERTISING"
        }
    ]
}
If a secondary CIDR is required, you can repeat the above process so that there are two unique ranges available for this feature. As you can see from above output, now you’ve successfully advertised the CIDR.
Let’s proceed with creating Global Accelerator using our new CIDR.
Using BYOIP with your Global Accelerator:
Once BYOIP CIDRs are successfully advertised, configured, and using BYOIP with Global Accelerator, using them is a simple process in either the AWS Command Line Interface (CLI) or the AWS Management Console.
In the AWS Management Console, first navigate to the Global Accelerator homepage and then click Create Accelerator.
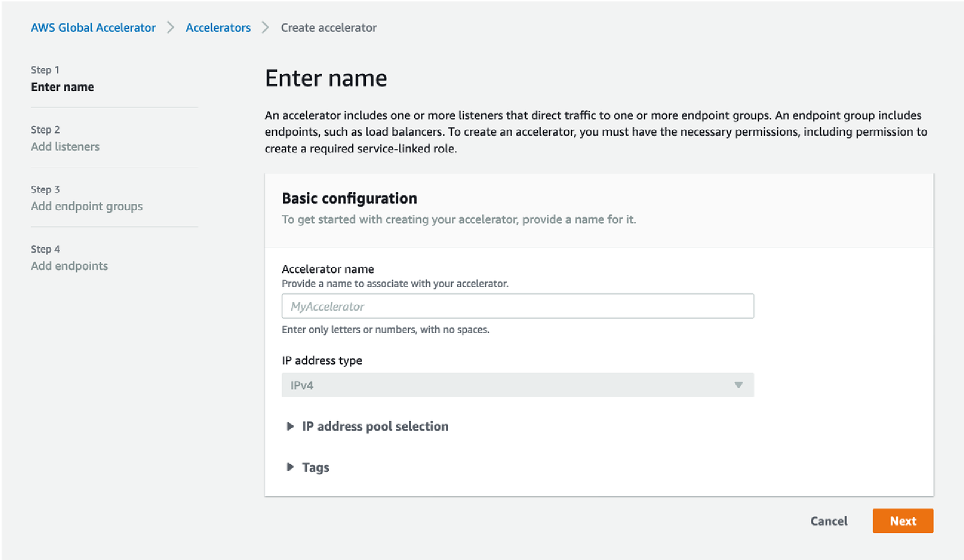
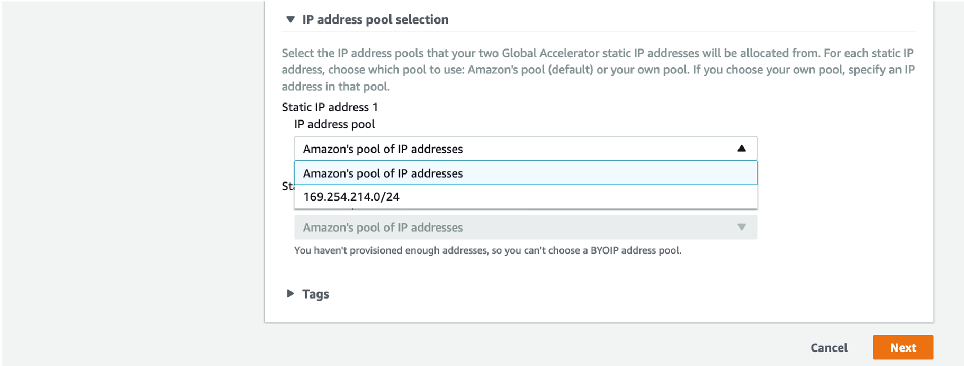
Once on the Create accelerator main screen, expand “IP address pool selection“. Once expanded, notice that you can now choose further options under ”Static IP address 1”, which is by default set to “Amazon’s pool of IP addresses”.
Clicking on this drop down menu reveals 169.254.214.0/24 (the CIDR that you’ve advertised in earlier steps).
For this example, we choose 169.254.214.1/32 for our newly created Global Accelerator.
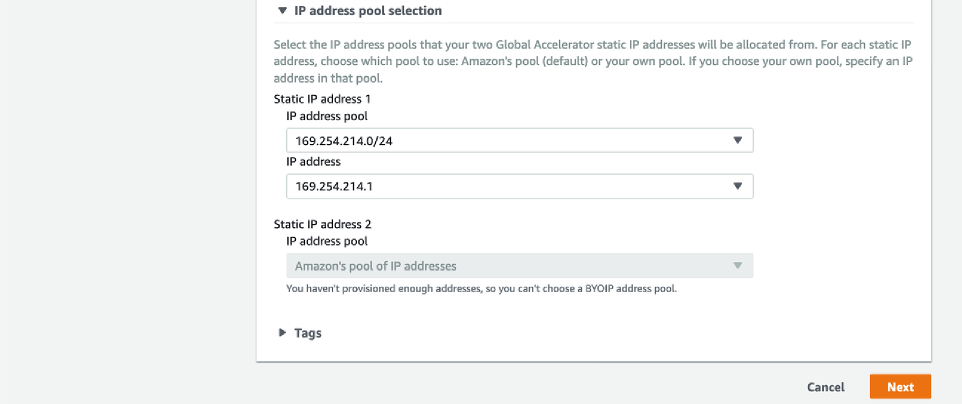
Also notice that the second “Static IP address 2” is grayed out as we’ve only advertised a single /24 CIDR at this stage. In this case, second IP for this Global Accelerator is assigned from Amazon’s pool of IP addresses.
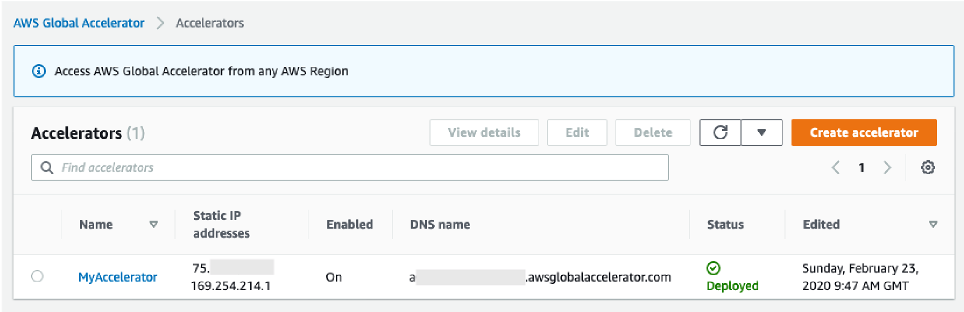
If importing two /24 CIDRs, “Static IP address 2“ point to the secondary pool of IP Addresses being advertised. Now you can press next and create the Global Accelerator. Once created successfully – notice that the Accelerator is displaying two IP addresses (169.254.214.1 and one from Amazon’s IP pool).
You can also achieve this by using following CLI command:
aws globalaccelerator create-accelerator --name MyAccelerator \
        --ip-address-type IPV4 \
        --ip-addresses 169.254.214.1 \
        --idempotency-token MyUniqueAccelerator \
        --region us-west-2
Few key things to note:
- BYOIP Provisioning process for BYOIP CIDRs can take up to 3 weeks.
- You can bring one or two /24 IP ranges to AWS Global Accelerator.
- You can use one or two /32 static IP addresses from BYOIP pool on Global Accelerator for each accelerator.
- Global Accelerator BYOIP CIDRs cannot be used as Elastic IP addresses in Amazon EC2 or vice versa.
- We recommend that you stop advertising your IP address range from other locations before you advertise it through AWS and make sure that your IP address range is advertised by AWS.