Introduction
This article will explain and show the use cases for using Nodepools in Kubernetes:
- Describe nodepools.
- System and user nodepools: what are they?
- How can I use Labels and nodeSelector to schedule application pods on a particular nodepool?
- How can Taints and Tolerations be used to schedule only certain application pods on a nodepool?
- How could nodepools be used to lower the risk associated with updating a cluster?
- How may each nodepool’s auto-scalability be set?
In a Kubernetes cluster, the containers are deployed as pods into VMs called worker nodes.
These nodes are identical as they use the same VM size or SKU.
This was just fine until we realized we might need nodes with different SKU for the following reasons:
- It is preferable to deploy application pods and Kubernetes system pods (such as CoreDNS, metrics-server, and Gatekeeper addon) on different dedicated nodes. This is done to stop malicious or poorly configured application pods from unintentionally destroying system pods.
- Some pods need optimized, CPU- or memory-intensive virtual machines.
- Some pods need VMs with GPU support because they are processing ML/AI algorithms. These pricey GPU-enabled VMs should only be used by specific pods.
- To cut costs, some pods and workloads prefer to use spot and preemptible VMs.
- Some pods need Windows Containers, which are included with Windows VMs, to execute legacy Windows programs.
- Some groups prefer to physically separate their test, QA, staging, and other non-production environments from one another within the same cluster. This is so that fewer clusters may be managed substantially more easily.
These teams came to the conclusion that namespaces alone cannot provide logical isolation. These factors contributed to the cluster’s diverse nodes being created. Kubernetes introduces the Nodepool to make managing these nodes simpler. A collection of nodes with the same configuration is known as a nodepool (CPU, Memory, Networking, OS, maximum number of pods, etc.). Within the cluster, a single (system) nodepool is generated by default. Nodepools can be added, though, either before or after the cluster is created. These nodepools are also removable at any time. Two categories of nodepools exist:
1. System nodepool: preferably used to deploy system pods. There may be several system nodepools in Kubernetes. It must have at least one nodepool and one single node. Due to their dependence on Linux components, system nodepools can only be used with Linux (no support for Windows).
2. User nodepool: used to preferably deploy application pods. Kubernetes could have multiple user nodepools or none. All user nodepools could scale down to zero nodes. A user nodepool could run on Linux or Windows nodes.
Nodepool might have some ‘small’ different configurations with different cloud providers. This article will focus on Azure Kubernetes Service (AKS). Let’s see a demo on how that works with AKS.
1. Create an AKS cluster with one single system nodepool
We’ll start by creating a new AKS cluster using the Azure CLI:
 $ az group create -n aks-cluster -l westeurope
 $ az aks create -n aks-cluster -g aks-cluster
This will create a new cluster with one single nodepool called agentpool with 3 nodes.
$ kubectl get nodesThis node pool is of type System. It doesn’t have any taints. Taints allows a node to ‘accept’ only some pods to be deployed. The only pods that could be deployed are the ones using a specific Toleration. In other words, the node says « I cannot accept any pod except the ones tolerating my taints ». And the pods says « I could be deployed on that node because I have the required toleration ». More details about taints and tolerations here.
$ kubectl get nodes -o json | jq '.items[].spec.taints'But it has some labels for its nodes. Let’s show the labels with the following command:
$ kubectl get nodes -o json | jq '.items[].metadata.labels'2. Add a new user nodepool for the user applications
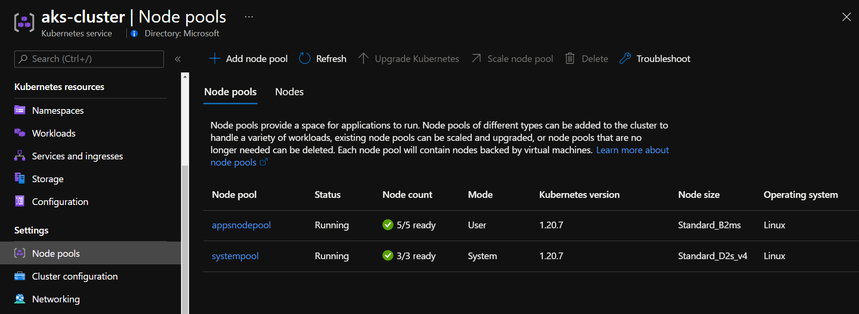
A new user nodepool will be added. The Azure portal might be used to accomplish that. Click “add nodepool” after going to the cluster and looking for Nodepools in the left blade.
The creation of the nodepool could be done also using the command line which have more options like specifying Spot instances.
$ az aks nodepool add `
     --resource-group aks-cluster `
     --cluster-name aks-cluster `
     --name appsnodepool `
     --node-count 5 `
     --node-vm-size Standard_B2ms `
     --kubernetes-version 1.20.7 `
     --max-pods 30 `
     --priority Regular `
     --zones 3 `
     --mode User
Note the –priority parameter that could be used with value “Spot” to create Spot VM instances. Spot instances are used for cost optimization.
We can then view the 2 nodepools from the portal or command line.
$ az aks nodepool list --cluster-name aks-cluster --resource-group aks-cluster -o tableThe end result of adding a new nodepool should be like the following:
3. Deploy an application into a specific nodepool.
By default, if we deploy a pod into the cluster, it could be deployed into any of the 2 nodepools.
However, we can choose to target a specific nodepool using Labels on nodepools and nodeSelector from deployment/pods.
Each nodepool have its own set of labels like the agent pool name (“agentpool”: “appsnodepool”,). We can use the label to target the nodes by using nodeSelector from the deployment file. More details about Labels and nodeSelector here.
Let’s show the labels of one of one of the users nodepool nodes with the following command. Make sure to replace the node name.
$ kubectl get node aks-appsnodepool-20474252-vmss000001 -o json | jq '.metadata.labels'{
“agentpool”: “appsnodepool”,
“beta.kubernetes.io/arch”: “amd64”,
“beta.kubernetes.io/instance-type”: “Standard_B2ms”,
“beta.kubernetes.io/os”: “linux”,
“failure-domain.beta.kubernetes.io/region”: “westeurope”,
“failure-domain.beta.kubernetes.io/zone”: “westeurope-3”,
“kubernetes.azure.com/cluster”: “MC_aks-cluster_aks-cluster_westeurope”,
“kubernetes.azure.com/node-image-version”: “AKSUbuntu-1804gen2containerd-2021.05.19”,
“kubernetes.azure.com/role”: “agent”,
“kubernetes.io/arch”: “amd64”,
“kubernetes.io/hostname”: “aks-appsnodepool-20474252-vmss000001”,
“kubernetes.io/os”: “linux”,
“kubernetes.io/role”: “agent”,
“node-role.kubernetes.io/agent”: “”,
“node.kubernetes.io/instance-type”: “Standard_B2ms”,
“storageprofile”: “managed”,
“storagetier”: “Premium_LRS”,
“topology.kubernetes.io/region”: “westeurope”,
“topology.kubernetes.io/zone”: “westeurope-3”
}
Let’s consider the following yaml deployment using the nodeSelector of pool name:
# app-deploy.yaml
apiVersion: apps/v1
kind: Deployment
metadata:
  labels:
    app: app-deploy
  name: app-deploy
spec:
  replicas: 100
  selector:
    matchLabels:
      app: app-deploy
  template:
    metadata:
      labels:
        app: app-deploy
    spec:
      containers:
      - image: nginx
        name: nginx
      nodeSelector:
        agentpool: appsnodepool
Let’s deploy the yaml file.
$ kubectl apply -f app-deploy.yamlNote how all the 100 pods are all deployed to the same user nodepool.
$ kubectl get pods -o wide4. Deploying system pods into system nodepool
Only the user nodepool will receive the deployment of the application pods. The system pods, however, might be moved to the user nodepool. We want to physically isolate these important system pods, therefore we don’t want it to happen. Use of Taints on the nodepool and Tolerations on the pods will solve this issue.
System pods like CoreDNS already have default tolerations like CriticalAddonsOnly.
tolerations:
- key: CriticalAddonsOnly
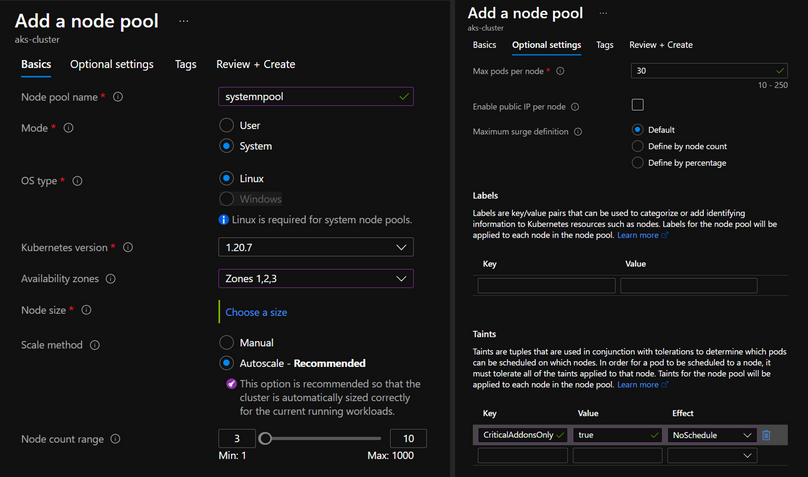
operator: Exists$ kubectl get deployment coredns -n kube-system -o json | jq ".spec.template.spec.tolerations"To allow these system pods to be deployed only to system nodepool, we need to make sure the system nodepool defines a taint with the same name. As seen earlier, the system nodepool doesn’t have any taints by default. Unfortunately, we can add taints only during nodepool creation, not after. So we need to create a new system nodepool with taint (CriticalAddonsOnly=true:NoSchedule).
$ az aks nodepool add `
     --resource-group aks-cluster `
     --cluster-name aks-cluster `
     --name systempool `
     --node-count 3 `
     --node-vm-size Standard_D2s_v4 `
     --kubernetes-version 1.20.7 `
     --max-pods 30 `
     --priority Regular `
     --zones 1, 2, 3 `
     --node-taints CriticalAddonsOnly=true:NoSchedule `
     --mode System
The same thing could be achieved using the Azure portal :
System pods will still run on old system nodepool until we drain that nodepool or delete it.
Let’s go to delete it from the portal or the following command.
$ az aks nodepool delete --cluster-name aks-cluster --resource-group aks-cluster --name agentpoolLet’s now verify that system pods (except the DaemonSets) are deployed only into the new system nodepool nodes :
$ kubectl get pods -n kube-system -o wideBe aware that adding the following tolerance to the pod or the deployment will compel pods to be scheduled into the system nodepool. This needs to be done for the Calico, Prometheus, and Elasticsearch components.
      tolerations:
        - key: CriticalAddonsOnly
          operator: Exists
5. Using Nodepools to upgrade the cluster with less risk.
Upgrading the entire cluster (control plane and all nodepools) might be a risky operation. Nodepools could be leveraged to reduce this risk. Instead of upgrading the nodepool, we proceed with blue/green upgrade:
- Upgrade only the control plane to the newer version.
az aks upgrade –name N --resource-group G --control-plane-only - Create a new nodepool with the newer k8s version.
- Deploy the application pods in the newer nodepool.
- Verify the application works fine on the new nodepool.
- Delete the old nodepool.
Conclusion
Using nodepools we can physically isolate system and user application pods.
It could be also used to isolate different applications, teams, or environments.
It helps also to upgrade the cluster with less risk.
In addition to that it helps to use a new Subnet with different IP range if needed.
And it helps to reset the max pods per node which might be forgotten during cluster creation.
Resources:
https://docs.microsoft.com/en-us/azure/aks/use-system-pools
https://docs.microsoft.com/en-us/azure/aks/use-multiple-node-pools