Users of Ubuntu and Linux operating systems can use the command line to connect to a file system and write files. Mount targets serve as network access points for file systems. After your mount target is assigned an IP address, you can use it together with the export path to mount the file system. On the instance from which you want to mount the file system, you need to install an NFS client and create a mount point. When you mount the file system, the mount point effectively represents the root directory of the File Storage file system, allowing you to write files to the file system from the instance. You can mount to any directory within the file system.
Prerequisites
- The file system must have at least one export in at least one mount target. When you create a new file system, an export for the file system is created at the same time. See Creating File Systems for more information.
- Correctly configured security rules for the mount target. See Security Rules for information about how security rules work in Oracle Cloud Infrastructure. Use the instructions in Configuring VCN Security Rules for File Storage to set up security rules correctly for your file systems.
To mount a file system from Linux, Red Hat, or CentOS
- Open a command window. Then, get the NFS client by copying and pasting the Install Command from the Console or typing the following:
sudo yum install nfs-utils2. Create a mount point by copying and pasting the Create Mount Point Command from the Console or type the following, replacing yourmountpoint with the local directory from which you want to access your file system.
sudo mkdir -p /mnt/yourmountpoint3. Mount the file system by copying and pasting the Mount Command from the Console or type the following:
sudo mount -o nosuid,resvport 10.x.x.x:/fs-export-path /mnt/yourmountpoint- Replace
10.x.x.x:with the local subnet IP address assigned to your mount target. - Replace
fs-export-pathwith the export path you specified when associating the file system with the mount target. - Replace
yourmountpointwith the path to the local mount point.
4. View the file system.
df -h5. Write a file to the file system by typing the following. Replace yourmountpoint with the path to the local mount point and helloworld with your file name.
sudo touch /mnt/yourmountpoint/helloworld6. Verify that you can view the file by typing the following. Replace yourmountpoint with the path to the local mount point.
cd /mnt/yourmountpoint
ls
See Mount Command Fails in Troubleshooting Your File System for more information about common issues you may encounter. See if you want to mount a subdirectory of the file system.
Mounting File System Subdirectories
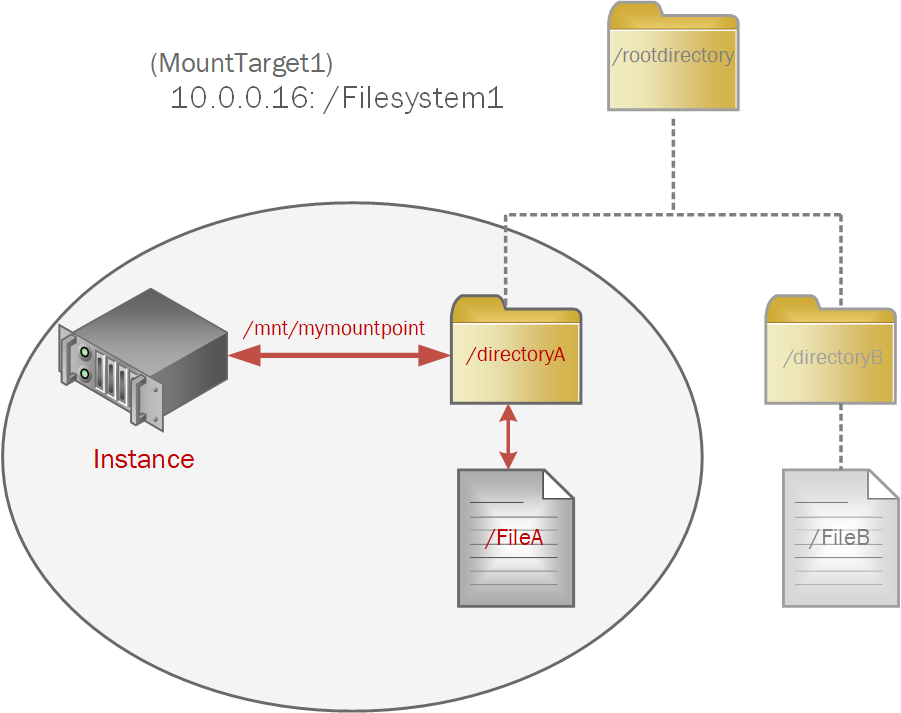
If your file system has an existing directory structure, you can mount any file system subdirectory. The subdirectory becomes the effective root directory at the mount point of the instance, and excludes sibling directories.
For example, suppose “FileSystem1” has an export path of /FileSystem1 and a directory structure like this:

The file system is exported from “MountTarget1” which has an IP address of 10.0.0.16.
The following command mounts directoryA to the instance mount point /mnt/mymountpoint:
sudo mount -o nosuid,resvport 10.0.0.16:/FileSystem1/rootdirectory/directoryA /mnt/mymountpointNeither directoryB or FileB would be accessible from the instance mount point.
To mount a file system subdirectory
- Open a command window. Then, get the NFS client by copying and pasting the Install Command from the Console or typing the following:
sudo yum install nfs-utils2. Create a mount point by copying and pasting the Create Mount Point Command from the Console or type the following, replacing yourmountpoint with the local directory from which you want to access your file system.
sudo mkdir -p /mnt/yourmountpoint3. Mount the file system by copying and editing the Mount Command from the Console or type the following:
sudo mount -o nosuid,resvport 10.x.x.x:/fs-export-path/directory-path /mnt/yourmountpoint- Replace
10.x.x.x:with the local subnet IP address assigned to your mount target. - Replace
fs-export-pathwith the export path you specified when associating the file system with the mount target. - Replace
directory-pathwith the path from the root directory to subdirectory you want to mount. - Replace
yourmountpointwith the path to the local mount point.
4. View the file system.
df -h5. Write a file to the file system by typing the following. Replace yourmountpoint with the path to the local mount point and helloworld with your file name.
sudo touch /mnt/yourmountpoint/helloworld6. Verify that you can view the file by typing the following. Replace yourmountpoint with the path to the local mount point.
cd /mnt/yourmountpoint
ls
To unmount a file system
- Open a terminal window on the instance.
- Use the following command to unmount the file system:
sudo umount /mnt/yourmountpointReplace yourmountpoint with the path to the local mount point.