As I was reading through the Red Hat Enterprise Linux 8 Beta release notes, one thing that caught my eye was that a session recording solution had been added to RHEL 8 Beta, which allows for users’ terminal sessions to be recorded and played back at a later time.
Before coming to Red Hat to work as a technical account manager (TAM), I worked as a system administrator for 12 years. I can’t count the number of times that an issue would occur from human error, and management would come to me, asking me to figure out who had caused the issue. At that point, I would start looking through log files and shell history files. Based on that information, sometimes I would be able to figure out what and who had caused the issue, and other times it wasn’t possible. This was usually a labor intensive process which took a lot of time trying to piece together what users had previously been doing on a server.
It would have been great to have a tool like RHEL 8 session recording that recorded everything users did on the command line. Not only would that have made this detective process easier, but it might have prevented some oversights from happening in the first place if users were aware that what they were doing was being recorded. After all, people are usually on their best behavior when they know they are being recorded.
Based on these experiences, I was very intrigued with RHEL 8 Session recording. In this post, we will cover how to get started with RHEL 8 Session Recording.
Initial Installation and Configuration
The first step to getting started with session recording is to install the tlog package, which provides the session recording functionality, and the cockpit-session-recording package which allows for easy management and playback of sessions from the web console management tool.
yum install tlog cockpit-session-recording
If the cockpit service isn’t already running and enabled to start at boot, this can be done with systemctl:
systemctl enable --now cockpit.socket
The recommended way to use session recording in RHEL 8 Beta is in conjunction with SSSD, which many RHEL environments use to manage user authentication. In this example, I will setup a very basic SSSD configuration to manage local RHEL users.
To do this, I created an /etc/sssd/sssd.conf file with this basic example configuration:
[domain/local]
id_provider = files

[sssd]
domains = local
services = nss, pam, ssh, sudo
I then set the sssd.conf file permissions, and restart sssd:
chmod 600 /etc/sssd/sssd.conf
systemctl restart sssd
The next step is to open a web browser and to browse to the cockpit web interface, which is available on port 9090. I used firefox, and browsed to https://<IP-Address>:9090, where <IP-Address> is the IP address of the RHEL 8 server.
Login to cockpit either as the root user, or you can login with another user with sudo privileges, and check the box on the login screen to “Reuse my password for privileged tasks”.
Once logged in, click on the “Session Recording” link on the left hand menu, then click the configuration gear button in the upper right corner.

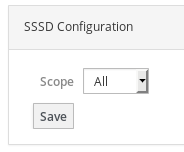
From here, several options can be configured such as a warning message to display to users to let them know their session is being recorded. I’ll stick to the defaults, and scroll down to the SSSD Configuration section. From here, I’ll set the “Scope” to “All”, and click the Save button. This will configure session recording for all SSSD users.

Testing Out Session Recording
At this point, we have a basic session recording configuration setup, and we will confirm that it’s working. I’ll login to the server over SSH:

Notice the warning message that this session is being recorded (this message is configurable).
Next, I’ll go ahead and run several commands which will be recorded, then exit out of the SSH session.
Back from the web console interface, if I go back to the “Session Recording” menu option, I can see the sessions that have been recorded, including: the user name, the start and end times, and the duration of the recording:

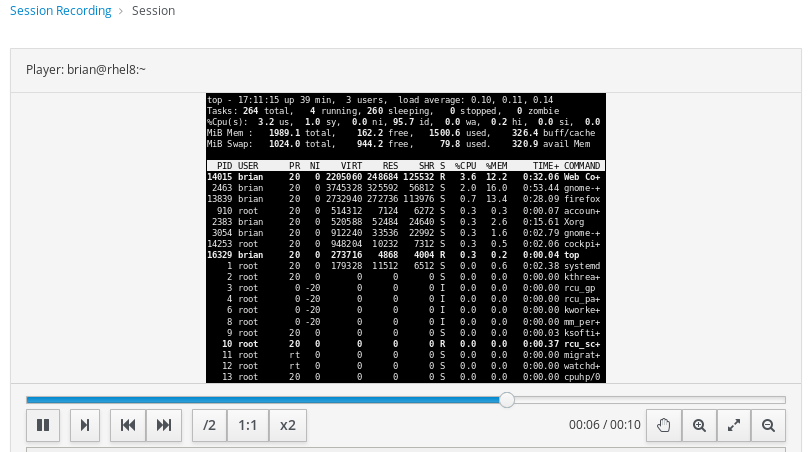
I’ll click on the this line, which will take me to the session recording player screen, where I can click the play button and watch what happened during the session. I can also change the playback speed to speed up or slow down the playback. In my recorded session, I had run the top command:

Accessing Recordings from the Command Line
It is also possible to access the recordings from the command line rather than the Cockpit web based interface. By default, the session recordings are stored in journalctl.
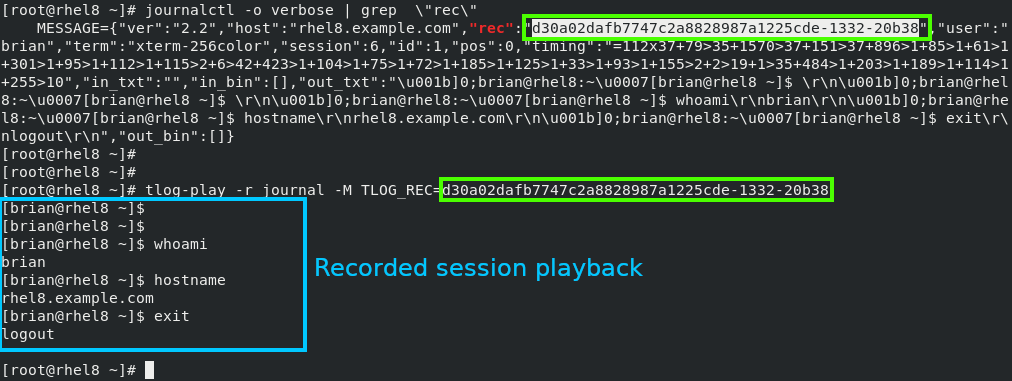
The first step to playing back a session from the command line is to find the recording ID, by running a command such as journalctl -o verbose | grep \"rec\".
Once the recording ID has been determined, the session can be played back with the tlog-play -r journal -M TLOG_REC= command, where recording_ID is the recording ID found with the previous journalctl command.
As an example, see the screenshot of session playback:
