Configure Automatic Zone Balance for Azure Virtual Machine Scale Sets (VMSS)
Automatic Zone Balance in Azure VM Scale Sets ensures that virtual machines (VMs) are evenly distributed across Availability Zones in a region. This improves fault tolerance and availability. Below is a detailed guide using the Azure Portal and Azure CLI.
Azure Automatic Zone Balance
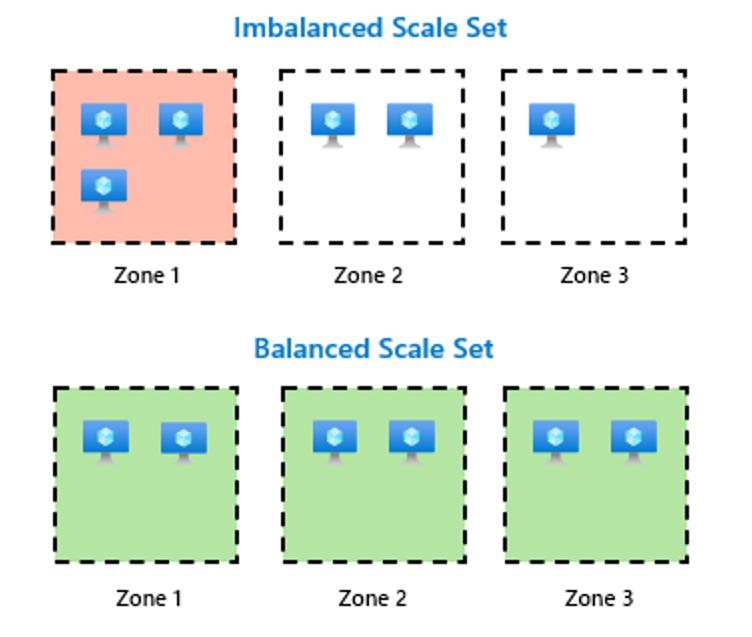
Technical demonstration: Example of an imbalanced VMSS:
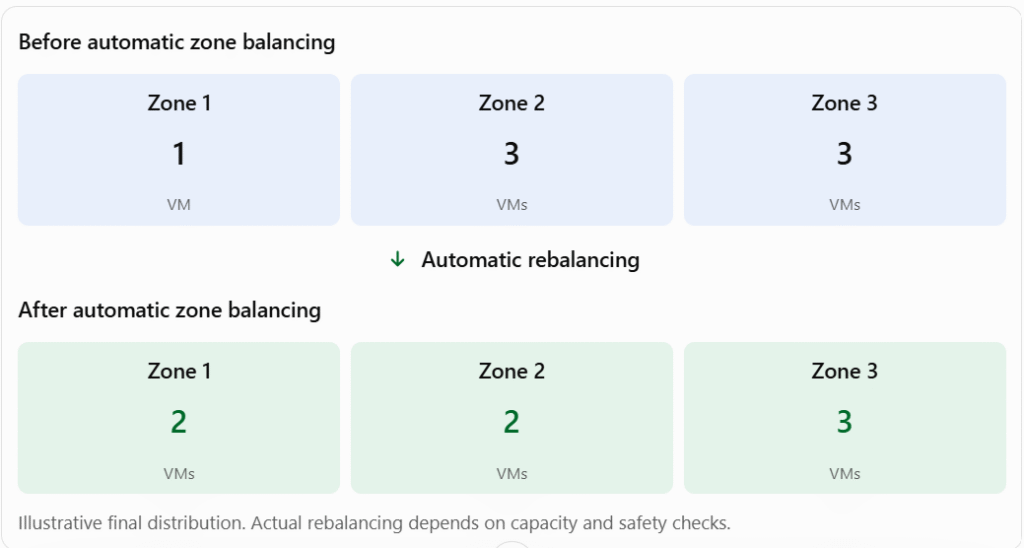
Important technical points:
- Uses a create-before-delete approach.
- Waits for the new VM to become healthy before deleting the original VM.
- Requires at least two availability zones and application health monitoring.
- Requires sufficient subscription quota and temporary capacity.
- Intended primarily for stateless workloads.
- The feature is currently in preview.
How automatic rebalancing works
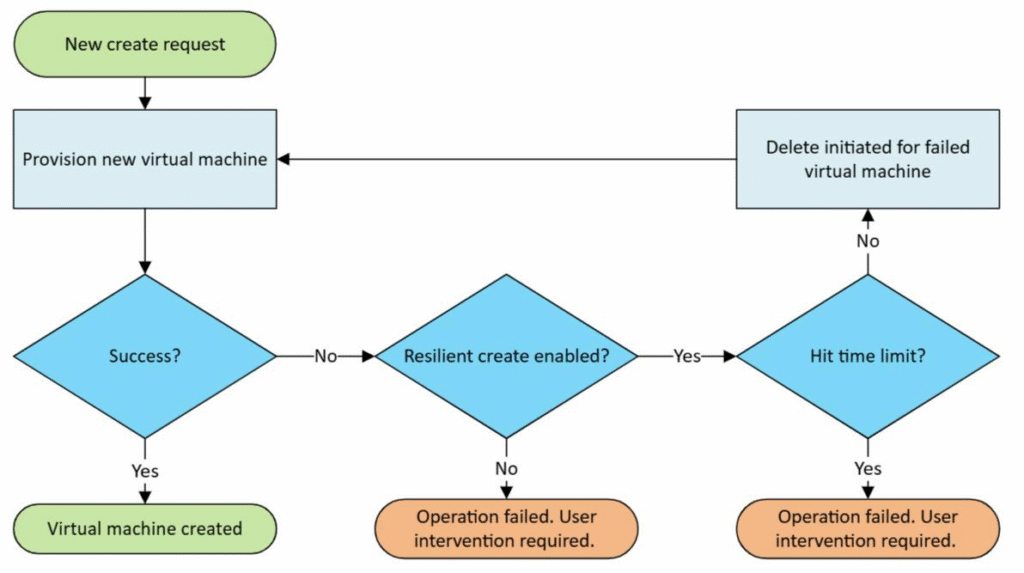
“Let’s understand the actual rebalancing workflow.
Azure continuously monitors the zone distribution of the scale set.
When an imbalance is identified, Azure performs the following steps.
Step one: Azure identifies the under-provisioned Availability Zone.
Step two: Azure creates a replacement virtual machine in that zone.
Step three: Azure checks the health of the newly created virtual machine using the configured application health monitoring mechanism.
Step four: Once the new virtual machine becomes healthy, Azure deletes a virtual machine from an over-provisioned zone.
This process is called Create Before Delete.
Only one virtual machine is moved per rebalance operation, helping to minimize infrastructure changes and application disruption.
This is a best-effort background operation. It may be delayed if the target zone does not have sufficient capacity.”
Azure Portal configuration demonstration
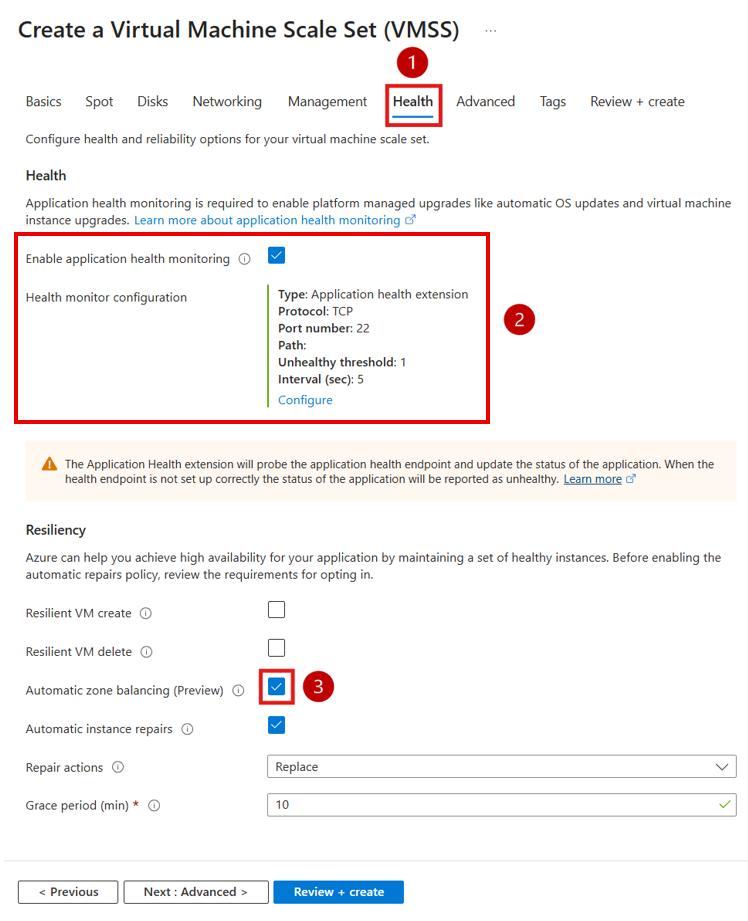
“Now let’s configure Automatic Zone Balance using the Azure Portal.
First, sign in to the Azure Portal.
Navigate to Virtual Machine Scale Sets.
Select Create to deploy a new scale set, or open an existing scale set.
For a new scale set, select the subscription and resource group.
Enter the scale set name and select the Azure region.
Under Availability Zones, select at least two Availability Zones.
Next, configure the virtual machine image, instance size, administrator account, and networking.
Navigate to the Health configuration section.
Enable application health monitoring.
You can use the Application Health Extension or a Load Balancer health probe. Only one health monitoring method should be enabled.
Configure the application health endpoint.
For example, use an HTTP health endpoint on port 80 with the path slash healthEndpoint.
Now enable the Automatic Zone Balancing option.
Review the remaining configuration, validate the deployment, and select Create.
For an existing scale set, navigate to Availability under Availability and Scale.
Confirm that at least two zones are configured.
Then navigate to Health and Repair under Operations.
Under the Resiliency section, enable Automatic Zone Balancing and save the configuration.
Your scale set is now configured for automatic zone balancing, subject to subscription feature registration and preview eligibility.”Visual production note: Use actual Azure Portal screen recording for the Availability, Health and Repair, and Resiliency settings. Portal labels may vary by deployment experience.
Prerequisites
- Azure Account: Active subscription with appropriate permissions.
- Region with Multiple Availability Zones: e.g.,
East US,West Europe,Southeast Asia. - Resource Group: Existing or create a new one.
- VM Image/SKU Support: Ensure the VM series/image is available in all zones of your region.
Method 1: Using Azure Portal
Step 1: Log in to Azure Portal
- Go to Azure Portal.
- Click All services > Virtual machine scale sets.
Step 2: Create a Virtual Machine Scale Set
- Click + Create > Virtual Machine Scale Set.
- Basics Tab:
- Subscription: Select your subscription.
- Resource group: Create new or select existing.
- Region: Choose a region with ≥2 Availability Zones (e.g.,
East US). - Name: Enter a name (e.g.,
my-zonal-vmss).
- Configure Inbound Traffic:
- Choose load balancing options (e.g., Azure Load Balancer or Application Gateway).
- Enable Public IP addresses if needed.
- Scale Out Control:
- Configure auto-scaling rules (optional but recommended).
- Advanced Configuration (Critical for Zone Balance):
- Scroll to the Availability section.
- Availability zone:
- Select Zone balanced ✅.
- This enables automatic distribution across zones.
- Availability set: Leave None (Zone balance replaces availability sets).
- Configure VM Settings:
- VM instance count: Set initial count (e.g., 3).
- Admin account and Authentication type: Configure credentials.
- Hardware: Choose VM size, disk type, etc.
- Review + Create:
- Validate settings.
- Click Create to deploy the VMSS.
Step 3: Verify Zone Distribution
- Navigate to your VMSS in the portal.
- Go to Instances.
- Check the Zone column to confirm VMs are distributed across zones (e.g., Zone 1, Zone 2, Zone 3).
- With 3 VMs, you’ll see ~1 VM per zone (or balanced as per Azure’s algorithm).
Method 2: Using Azure CLI
Step 1: Login to Azure
az loginStep 2: Create a Resource Group
az group create --name myResourceGroup --location eastusStep 3: Create a VM Scale Set with Zone Balance
az vmss create \
  --resource-group myResourceGroup \
  --name my-zonal-vmss \
  --location eastus \
  --zones "1" "2" "3" \  # Required to enable zone awareness (list all zones in region)
  --zone-balance true \  # Enables automatic zone balance
  --admin-username azureuser \
  --generate-ssh-keys \
  --instance-count 3 \
  --vm-sku Standard_D2s_v3 \
  --image UbuntuLTS \
  --upgrade-policy-mode automatic
Key Parameters Explained:
--zones "1" "2" "3": Specifies the region supports 3 zones (adjust based on your region).--zone-balance true: Enables automatic even distribution.--upgrade-policy-mode automatic: Ensures updates are rolled out evenly.
Step 4: Verify Zone Distribution
List instances and their zones:
az vmss list-instances \
  --resource-group myResourceGroup \
  --name my-zonal-vmss
Output Example:
[
  {
    "id": "/subscriptions/.../virtualMachines/my-zonal-vmss_0",
    "name": "my-zonal-vmss_0",
    "zone": "1"
  },
  {
    "id": "/subscriptions/.../virtualMachines/my-zonal-vmss_1",
    "name": "my-zonal-vmss_1",
    "zone": "2"
  },
  {
    "id": "/subscriptions/.../virtualMachines/my-zonal-vmss_2",
    "name": "my-zonal-vmss_2",
    "zone": "3"
  }
]
Key Considerations
1. Region Requirements
- Only regions with ≥2 Availability Zones support zone balance.
- Check zone availability via:
az account list-locations --query "[?zoneDetails!=null].[name, zoneDetails]" -o table2. Scaling Operations
- When you scale out (Manual or Auto-Scaling), Azure automatically places new VMs in the least populated zone.
- Example: Scaling from 3 to 4 VMs → Distribution becomes
2VMs in one zone,1each in the others.
3. Limitations
- Cannot manually assign zones when
--zone-balanceistrue. - Down-time during upgrades: Use automatic upgrade policy with maximum surge count to minimize impact.
4. Monitoring
- Use Azure Monitor or Log Analytics to track zone distribution:
  az monitor metrics list \
    --resource my-zonal-vmss \
    --resource-group myResourceGroup \
    --metric "ZoneRedundancy" \
    --interval PT1M
Troubleshooting
| Issue | Solution |
|---|---|
| Zones not created | Ensure region supports zones and --zones parameter matches the region. |
| All VMs in one zone | Scale out instances beyond the number of zones to trigger rebalancing. |
| SKU not available in a zone | Choose a VM size available in all zones (use az vm list-skus). |
Conclusion
By enabling Automatic Zone Balance, your VM Scale Set ensures high availability and resilience against zone failures. Use the Azure Portal for a guided experience or Azure CLI for automation. Always verify zone distribution after scaling events!
Next Steps:
- Configure Auto-Scaling rules.
- Integrate with Azure Load Balancer for traffic distribution.
- Monitor zone health using Azure Advisor.
Reference: Automatic zone balance for Virtual Machine Scale Sets